Monday, October 3, 2011

Paul Klee's Red Balloon

Paul Klee
(1879-1940)
Swiss German painter

He was influenced by Expressionism, Cubism and Surrealism

"Color has taken hold of me...it will possess me always...color and I are one.   I am a painter."

I personally am a big fan.  His paintings are some of my favorites at the Art Institute of Chicago.

"Red Balloon", painted in 1920 is not at the Art Institute of Chicago, but rather at the Guggenheim.
I really like this one and thought I would give it a go with my students!

Materials needed:
- Bleeding tissue paper (not the same as regular tissue paper)
- White watercolor paper
- Scissors
- Brushes
- Water
- Glue sticks
- Black pencil
- Example of original painting of "Red Balloon" (optional)


Directions:

1.  Bleeding tissue paper is awesome!  Show the students how to overlap pieces of the tissue paper then paint on a little bit of water.  Watch how the colors run and how the colors bleed!

(I precut squares to save time and also, only gave them a few choices of colors for the background)
2.  Once your paper is covered and the pieces are wet through enough, students can peel away the wet tissue paper to reveal the color underneath!  Cool right?


3.  Once the paper is dry, then we took a few "pops" of color and glued them on to the background.  NO WATER.  just glue.
(Optional - precut red circles for the balloons)

4.  Draw on the basket and any other detail you would like!  Some of the students tried really hard to copy Paul Klee exactly and others had their own take on it.  Either way - it was fun!


Wednesday, September 21, 2011

Bikes by Joel

Great idea from ART with Mrs. Smith...

Joel Henriques
Artist and father living in Portland.
Author of "Made to Play, Handmade Toys and Crafts for Growing Imaginations"

Wants people to connect art and life...
"I want to give people something not only to look at, but to live with and be a part of."

Materials needed:
-Black construction paper
-White crayons
-Scissors
-Colored strips of construction paper (I pre-cut mine)

Directions:
1.  Have the students draw a line 3/4 of the way down on their paper.  Below the line will be where you glue the colored paper and above the line will be where you draw the bike.
2.  We drew the bike, step by step; circles for the wheels, triangles for the bike frame...
3.  Once the bike is drawn, then students can glue the colored strips at the bottom.

Cute!  Contemporary!  Cool!


Monday, September 12, 2011

Sunsets & Silhouettes

This project is simple and sweet...the kids always have fun and the results are always unique and wonderful!

Materials needed:
-Black construction paper
-White Watercolor paper
-Liquid watercolors in red, orange, yellow, purple
-Brushes
-White pencil
-Scissors
-Glue stick

The kids should first paint the sunsets.  While that is drying they can first draw, then cut out shapes they want out of the black construction paper.  I directed them to have one piece as the foreground and they can build from there.  


Thursday, August 25, 2011

3D Giant Butterflies and Bugs!

WOWEE!  SO FUN!

Directions:
1.  Using a big roll of white paper, we cut drew then cut out a BIG bug body
2.  Trace the first body to make a second
3.  Paint, color, glue, decorate the bug (both sides)!  Go nuts!  ...add Glossy Mod Podge for a little extra shine :)
4.  Staple the 2 sides together, leaving a hole to stuff the bug
5.  Using shredded paper from our office shredder and donated newspapers we stuffed and stuffed
6.  Once your bug is fat enough, close it up with a few more staples
7.  Add pipe cleaner for legs and antennas


Friday, July 15, 2011

2D Giant Butterfly

Materials needed:
-Big white drawing paper
-Crayons
-Scissors
-Black construction paper
-Glue

Directions:
1.  Fold the big white drawing paper in half
2.  Draw one half of a butterfly, just one wing, in black crayon...press HARD
3.  Fold the butterfly in half the opposite way
4.  Using a tool (like a wide popsicle stick) press down and rub the stick over the paper...the idea is to transfer the crayon enough to the other side so you can have a mirror image of the design
5.  Trace over the ghost lines with black crayon, pressing equally as hard so it's the same on both sides
6.  Color it in
7.  Glue a butterfly body in the middle

Wednesday, June 22, 2011

Paper Mache Fish

It's summertime art camp fun!

Directions:

1.  Apply paper mache around a blown up balloon.
2.  Once dry, pop the balloon and cut around where the balloon was tied to make the fish mouth.  
3.  Use paint, tissue paper, glitter, whatever else you have on hand to make some really cool and exotic tropical fish!  


Tuesday, May 31, 2011

Mona Lisa's Summer Vacation

I love this project so much!  The results are always so fun and whimsical!
I have done it a few times.  You can find another version of the same idea here with a lesson on the Dada Movement in art - http://cinnamonraisintoast.blogspot.com/2010/01/dada-project-with-mona-lisa.html

Here are the results of our latest efforts...

Basically you just need to download a picture of Mona Lisa and then let your imagination run wild!

I asked the kids what they were going to do on the summer break.  Then I told them to pretend you were taking Mona Lisa with you.  Imagine her in that environment.  Mona Lisa visiting the Taj Mahal, Mona Lisa selling ice cream, Mona Lisa at the botanical gardens, on a boat, picking flowers....you get the idea!

Monday, May 30, 2011

Little Blue Horse inspired by Franz Marc

Franz Marc was a German Expressionist painter who was also influenced by futurism and cubism.
He liked bold colors and often painted animals.  I was inspired by this painting "Little Blue Horse" and decided to have my students replicate the bold colors and they were so excited to learn how to draw a horse! (tutorial coming soon)

Materials needed:
- Circle templates for horse drawing (optional)
- Pencils
- Erasers
- Black Sharpie
- Watercolor paint
- Watercolor paper - one piece for the horse, one piece for the background
- Brushes
- Scissors
- Glue

Directions:
1.  I started with a simple tutorial on how to draw a horse, starting with only 4 circles.  (tutorial pics coming soon!)  We sketched the horse, outlined the outside edges with Sharpie and erased all the pencils lines.
2.  Once the horse is outlined, paint it blue, demonstrate how to get darker and/or lighter blue.  Encourage experimentation with getting different shades of blue.
3.  Once dry, cut out the horse
4.  Using Marc's Little Blue Horse as an example, paint the background landscape using bright watercolors to mimic the colors in the horizon, foreground, etc.
5.  Once background is dry, glue horse down.

 Take a look at what we made!  WOW!  They did a great job!


Sunday, May 1, 2011

Black & White & Franz Kline

Franz Kline was an American abstract expressionist painter.

I really like the simplicity of his black and white paintings, like Mahoning, painted in 1956.

The students and I looked at his work together and discussed what we saw in them.  Some students said his paintings reminded them of Japanese writing, some thought his painting looked like train tracks.  I would say, all answers are correct!

So then we tried to recreate Kline's simple style using black tissue paper.

Materials needed:
-Black tissue paper (I pre-cut some into small squares)
-Big white watercolor paper (or any paper heavy enough to take a generous amount of Mod Podge)
-Mod Podge
-Scissors
-Pencils

Directions:
1.  Have the students draw with pencil a few lines on the white paper.  I directed them to do 2 horizontal, 2 vertical (all the entire length of their paper) then a shape or 2 of their choosing.
2.  Take one square of black tissue paper at a time, using Mod Podge to "glue' it down on the pencil line.  Repeat Mod Podging the squares, following all the lines.
3.  Once all the pencil lines are covered, apply a generous amount of Mod Podge all over the paper, sealing it and giving it a nice shine and texture.

Monday, April 25, 2011

Poems & Painting with Cy Twombly

Cy Twombly is an American artist who is know for his big, graffiti style paintings.
He often quoted poets and myths in his paintings too.
I personally love his style and wanted to replicate his "Rose" series.


First we constructed a poem together as a group.  I did it "mad lib style" where the kids filled in the blanks to create a more personalized poem.

Materials needed:
-Black construction paper, cut into long rectangles
-White pencils
-Colored construction paper for flowers
-Scissors
-Glue
-Red paint

Directions:
1.  Start by having the students write the poem on one side of the black paper in white pencil.
2.  Next have them cut out 3 flower shapes out of a colored construction paper.  You may choose to create a template that they trace for a more uniform flowers
3.  Glue the flowers in a row on the black paper
4.  Apply red paint over the flowers.  I demonstrated how to do this to create the illusion of flower petals.

Tuesday, April 12, 2011

Warm/Cool Color Study...con't

COLOR STUDY - TAKE TWO

First, we started with 2 ABSTRACT paintings.
One using only warm colors, the second using only cool colors.

Next, we ripped, cut and glued the two paintings, creating one awesome abstract!

Look at these!  2 very different results, both super interesting!


Monday, April 4, 2011

Warm/Cool Color Study

Teaching your students about warm vs. cool colors is a great way to expand their art vocabulary.
Warm colors...think summer, sun, campfire...reds, yellows, oranges, pinks....
Cool colors...think winter, icicles, water...blues, greens, purples...

COLOR STUDY - TAKE 1

First, we began by painting two ABSTRACT paintings.
One in only warm colors.  The second in only cool colors.

Next we wove the two painting together!

Here are some examples...


Monday, March 7, 2011

Georgie O'Keefe's Flowers II

This is one of my most favorite projects... it never fails to get ooh's and ahh's from parents...and the kids have a blast.
For materials and directions see the April 2, 2010 entry but I wanted to share some photos of examples from this class.

Enjoy!

I used an old calendar that had great photos of flowers.  We took a piece of paper with a square cut out to frame the section of the flower we wanted to focus on.  Just like Georgia O'Keefe, painting the details of the flower, almost making it abstract.  Really awesome!
  

Wednesday, February 23, 2011

Magritte - The Banquet

After my last trip to The Art Institute of Chicago I fell in love with this Magritte painting called, "The Banquet".  I was mesmerized but that bright red sun in the middle.  I think I stood there and looked at this painting for 20 minutes.

Materials needed:
-Watercolor paper 11x14 and a smaller piece cut to about 2x14
-Watercolor paint
-Black & Gray paint
-Brushes
-Sponges
-Scissors
-Red felt

Directions:
(This was a 2 day project)
1.  Paint the sunset sky with water color, paint the entire piece of paper
2.  While that is drying on the smaller separate piece of paper paint the gray brick wall.  I gave the students the idea of painting the entire piece gray, then use the other end of the brush to "scratch" in the bricks...worked pretty good I think!

-next day-
1.  Paint with black paint the tree trunks only
2.  Then take a sponge dipped in black paint to make the tree tops.
3.  Glue the brick all at the bottom
4.  Cut out a circle out of the red felt then glue it in the middle.

Monday, February 14, 2011

I heart Jim Dine

Jim Dine
American artist, liked to use familiar objects in his work, like hearts!  I thought this would be a great artist to talk about around Valentines Day! 


Materials needed:
-Black construction paper
-Pink and White crayons
-Watercolor paper
-Watercolor paint in red, orange, purple
-Glue
-Scissors

Directions:
1.  First have the kids fill up their entire sheet of black paper with rows of little x's and o's
2.  Next have them fold a piece of watercolor paper and draw half of a heart, then cut it out.  I did a demo then step by step we drew the heart then cut.  You could also opt to use a template.
3.  Using watercolors, paint the entire heart
4.  Glue heart to black paper

What a sweet piece of artwork!  Just in time for Valentines Day!  Would make a great gift!


Thursday, January 13, 2011

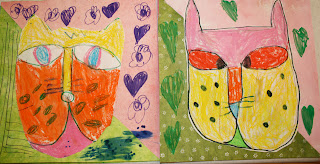
Laurel Burch Cats

Laurel Burch was a self-taught American painter/folk artist.

She died young at age 62 from a bone disease but even during the time when she was sick and had to paint in bed or from her wheelchair, she never stopped creating.  She said, "I refuse to have anything in my life that I can't turn around into something magical and beautiful.  I just refuse."

She has a great imagination.  Joy and happiness came through in her paintings with her bold lines and bright colors.  Her cats are so fun and whimsical!  My students love her work and they made some great versions of their own cats too!  Check this out...

Materials needed:
-White paper
-Colored paper (We had a pad of donated scrapbooking paper that had awesome colors and patterns)
-Crayons
-Scissors
-Glue

Directions:
1.  Students followed my step by step instructions for drawing the cat face.  (step by step tutorial coming soon)
2.  Color in the cat face, encourage different bright colors
3.  Select 2 fun pieces of colored paper, fold them into a triangle and cut them in half.
4.  Glue 2 halves onto a whole piece (this is your background)
5.  Cut out the cat face and glue it on the background
6.  Add lines, whiskers, and anything you feel it needs.